Performing a Cross-Chain Swap with PKPs and Lit Actions
In this section, we will demonstrate how you can use PKPs and Lit Actions to perform a cross-chain swap. There are three parts to this flow:
- Using Lit PKPs as escrow
- Using Lit Actions to define swap conditions
- Implementing Mint/Grant/Burn with the Lit SDK
1) Using Lit PKPs as escrow
PKPs are decentralized key pairs generated by the Lit Network. Using Lit Actions, we can program PKPs to sign transactions when our pre-defined conditions are met, enabling a sort of 'trustless' escrow. In the following example, we'll use this functionality to execute a cross-chain swap.
Example:
Suppose Alice holds 100 token A on Base and Bob holds 100 token B on Chronicle and they both agree to a swap of,
- 4 token A from Alice to Bob on Base
- 8 token B from Bob to Alice on Chronicle
A complete code example can be found here.
How does this work?
- Mint a PKP: Start by minting a PKP on the Lit Network.
- Assign a Lit Action: Grant a specific Lit Action the ability to use your PKP using the Mint/Grant/Burn (M/G/B) method which will allow it to generate signatures according to the conditions you set.
- Burn the PKP: Finally, burn the PKP to ensure it can only be used within the confines of the Lit Action logic.
Learn more about Lit Actions here.
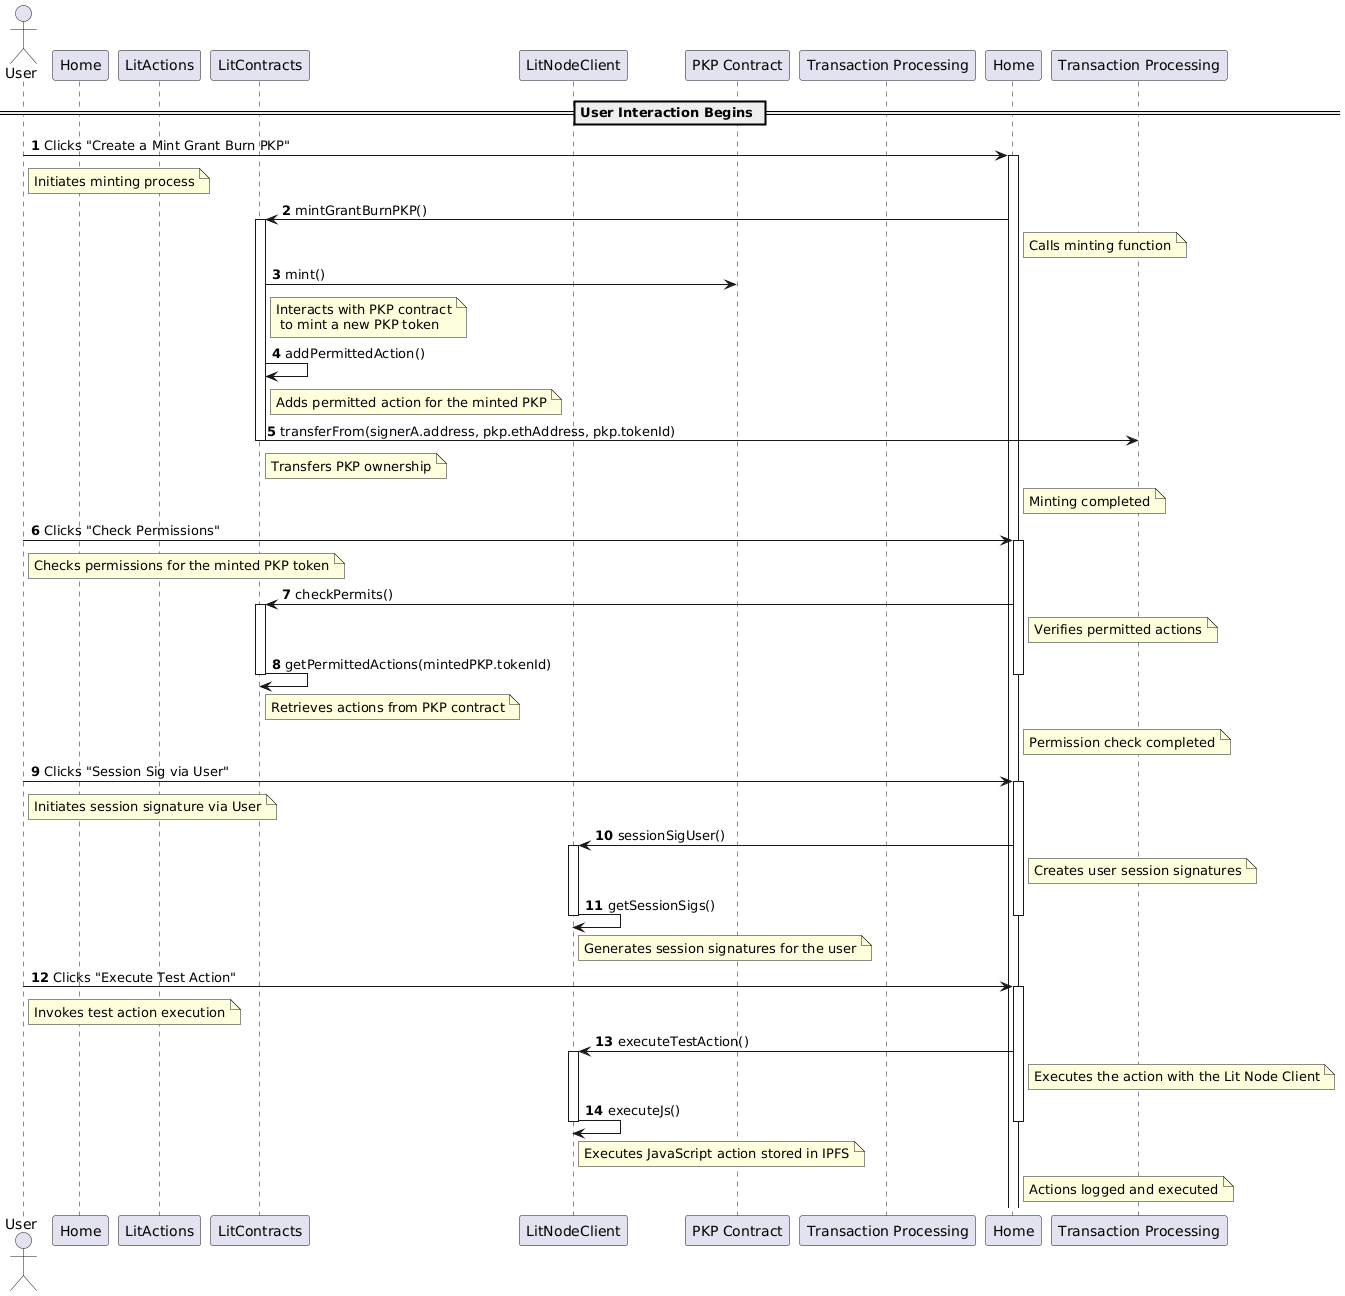
Architecture for Mint/Grant/Burn
2) Creating a Lit Action to define your swap conditions
For our swap Lit Action, both parties will need to deposit their funds to the PKP 'escrow'. The PKP will complete the swap when the conditions we set in the Lit Action have been met.
- Alice (or Bob) creates a Mint/Grant/Burn PKP
- Alice deposits 4 token A on Base Sepolia to the PKP
- Bob deposits 8 token B on Chronicle to the PKP
- Alice (or Bob) executes the Lit Action.
When the Lit Action is executed, each Lit node verifies that the conditions are met before provisioning their key share and executing the swap using the PKP
If the swap conditions aren't met, the Lit Action execution will revert and the tokens will be returned to the initial depositors (Alice and Bob)
Now we'll write the Lit Action that will be used to set the specific swap conditions that will be followed.
Below are the parameters for the cross-chain swap. In the example below, we'll be transferring 4 tokens A on Sepolia for 8 tokens B on Chronicle Yellowstone. These tokens are minted by a custom contract.
const chainAParams = {
    from: "0x48e6a467852Fa29710AaaCDB275F85db4Fa420eB",
    to: "0x291B0E3aA139b2bC9Ebd92168575b5c6bAD5236C",
    tokenAddress: "0xad50f302a957C165d865eD398fC3ca5A5A2cDA85",
    chain: "baseSepolia",
    amount: "4",
    decimals: 18,
    chainId: 84532,
};

const chainBParams = {
    from: "0x291B0E3aA139b2bC9Ebd92168575b5c6bAD5236C",
    to: "0x48e6a467852Fa29710AaaCDB275F85db4Fa420eB",
    tokenAddress: "0x2dcA1a80c89c81C37efa7b401e2d20c1ED99C72F",
    chain: "yellowstone",
    amount: "8",
    decimals: 18,
    chainId: 175188,
};
/*
deposit1: wallet X deposits on chain B, if action executes, funds are transferred to wallet Y
deposit2: wallet Y deposits on chain A, if action executes, funds are transferred to wallet X
*/
You can use any of the chains supported by Lit when setting your own swap parameters
The following code can be used to generate the swap Lit Action based on the parameters above: swapActionGenerator.js
Remember, once a Mint/Grant/Burn PKP is created, anyone can execute the Lit Action on the Lit Network. This execution needs to define the parameters needed by the Lit Action to run. While generating a sign or checking conditions on the action, we need information around the pkp for which we are doing it. Due to this, we need to construct our Lit Action in a way that works with any PKP.
Our Lit Action primarily focuses on 4 factors:
- Access control conditions (ACCs) to ensure that funds have been received on both chains
- Transaction objects for transferring funds between our two swap parties
- Clawback transaction objects to revert transferred funds back to their owners if the swap parameters aren't met
- Lit action conditions to determine which transaction objects should be signed and returned
We'll use an Access Control Condition (ACC) here to verify if the swap conditions are met before it is executed. These conditions are:
- Have token A funds reached on Chain A?
- Have token B funds reached on Chain B?
If yes, then forward the funds and complete the swap or else revert them.
A condition on Base Sepolia for checking if the PKP contains the exact amount of token A in Wei will look like this:
const chainACondition = {
    conditionType: "evmBasic",
    contractAddress: "0xad50f302a957C165d865eD398fC3ca5A5A2cDA85",
    standardContractType: "ERC20",
    chain: "baseSepolia",
    method: "balanceOf",
    parameters: ["address"],
    returnValueTest: { comparator: "==", value: "4000000000000000000" },
};
// parameter field would be later replaced by the pkpAddress in the action
We need to create two transaction objects, each of which will transfer the funds between the two swap parties that have been set. Each party will call the transfer(address, uint256) function on the token's smart contract. This information is captured in the "data" field of the object which we can fetch in the following way:
function generateCallData(counterParty, amount) {
    const transferInterface = new ethers.utils.Interface([
        "function transfer(address, uint256) returns (bool)",
    ]);
    return transferInterface.encodeFunctionData("transfer", [
        counterParty,
        amount,
    ]);
}
A transaction object would then look something like below
let chainATransaction = {
    to: "0xad50f302a957C165d865eD398fC3ca5A5A2cDA85",
    gasLimit: "60000",
    from: "0x291B0E3aA139b2bC9Ebd92168575b5c6bAD5236C",
    data: "0xa9059cbb000000000000000000000000291b0e3aa139b2bc9ebd92168575b5c6bad5236c0000000000000000000000000000000000000000000000003782dace9d900000",
    type: 2,
};
// "to" field specifies tokenA contract
// "from" field would be later replaced by the pkpAddress in the action
Clawback transaction objects are transactions that transfer funds back to the depositors if the swap conditions aren't met. These will have a different value for the data field and can be generated again using the generateCallData() function, with the counterParty value set to the depositor.
Now that we've covered all of the relevant background information, let's write our full Lit Action:
const go = async () => {
    const chainACondition = {"conditionType":"evmBasic","contractAddress":"0xad50f302a957C165d865eD398fC3ca5A5A2cDA85","standardContractType":"ERC20","chain":"baseSepolia","method":"balanceOf","parameters":["address"],"returnValueTest":{"comparator":">=","value":"4000000000000000000"}}
    const chainBCondition = {"conditionType":"evmBasic","contractAddress":"0x2dcA1a80c89c81C37efa7b401e2d20c1ED99C72F","standardContractType":"ERC20","chain":"yellowstone","method":"balanceOf","parameters":["address"],"returnValueTest":{"comparator":">=","value":"8000000000000000000"}}
    let chainATransaction = {"to":"0xad50f302a957C165d865eD398fC3ca5A5A2cDA85","gasLimit":"60000","from":"0x48e6a467852Fa29710AaaCDB275F85db4Fa420eB","data":"0xa9059cbb000000000000000000000000291b0e3aa139b2bc9ebd92168575b5c6bad5236c0000000000000000000000000000000000000000000000003782dace9d900000","type":2}
    let chainBTransaction = {"to":"0x2dcA1a80c89c81C37efa7b401e2d20c1ED99C72F","gasLimit":"60000","from":"0x291B0E3aA139b2bC9Ebd92168575b5c6bAD5236C","data":"0xa9059cbb00000000000000000000000048e6a467852fa29710aaacdb275f85db4fa420eb0000000000000000000000000000000000000000000000006f05b59d3b200000","type":2}
    let chainAClawbackTransaction = {"to":"0xad50f302a957C165d865eD398fC3ca5A5A2cDA85","gasLimit":"60000","from":"0x48e6a467852Fa29710AaaCDB275F85db4Fa420eB","data":"0xa9059cbb00000000000000000000000048e6a467852fa29710aaacdb275f85db4fa420eb0000000000000000000000000000000000000000000000003782dace9d900000","type":2}
    let chainBClawbackTransaction = {"to":"0x2dcA1a80c89c81C37efa7b401e2d20c1ED99C72F","gasLimit":"60000","from":"0x291B0E3aA139b2bC9Ebd92168575b5c6bAD5236C","data":"0xa9059cbb000000000000000000000000291b0e3aa139b2bc9ebd92168575b5c6bad5236c0000000000000000000000000000000000000000000000006f05b59d3b200000","type":2}

    chainATransaction.from = chainBTransaction.from = pkpAddress;

    chainACondition.parameters = chainBCondition.parameters = [
      pkpAddress,
    ];

    chainATransaction = {...chainATransaction, ...chainAGasConfig}
    chainBTransaction = {...chainBTransaction, ...chainBGasConfig}
    chainAClawbackTransaction = {...chainAClawbackTransaction, ...chainAGasConfig}
    chainBClawbackTransaction = {...chainBClawbackTransaction, ...chainBGasConfig}
Here, we are substituting the from field in the transaction objects with pkpAddress and replacing the parameters the field in the conditions object with pkpAddress.
We then, extend our transaction object with the gas configs which will be received during the execution of the action. We'll look into this later.
    const chainAConditionsPass = await Lit.Actions.checkConditions({
      conditions: [chainACondition],
      authSig: JSON.parse(authSig),
      chain: chainACondition.chain,
    });

    const chainBConditionsPass = await Lit.Actions.checkConditions({
      conditions: [chainBCondition],
      authSig: JSON.parse(authSig),
      chain: chainBCondition.chain,
    });

    console.log("chainAConditionsPass: ", chainAConditionsPass, "chainBConditionsPass: ", chainBConditionsPass);
Now our action checks if the conditions are passed on both chains, it takes authSig as a parameter here and then logs the result of both condition checks. We'll look into auth sigs while we learn to execute lit actions.
To generate signatures inside of our Lit Action, we'll use the Lit.Actions.signEcdsa method. Our Lit Action will verify that the conditions we've specified are met before generating the appropriate signed transactions which we'll be able to send to chain later
    if (chainAConditionsPass && chainBConditionsPass) {
      await generateSwapTransactions();
      return;
    }

    if (chainAConditionsPass) {
      await Lit.Actions.signEcdsa({
        toSign: hashTransaction(chainAClawbackTransaction),
        publicKey: pkpPublicKey,
        sigName: "chainASignature",
      });
      Lit.Actions.setResponse({
        response: JSON.stringify({
          chainATransaction: chainAClawbackTransaction,
        }),
      });
      return;
    }

    if (chainBConditionsPass) {
      await Lit.Actions.signEcdsa({
        toSign: hashTransaction(chainBClawbackTransaction),
        publicKey: pkpPublicKey,
        sigName: "chainBSignature",
      });
      Lit.Actions.setResponse({
        response: JSON.stringify({
          chainBTransaction: chainBClawbackTransaction,
        }),
      });
      return;
    }

    const generateSwapTransactions = async () => {
      await LitActions.signEcdsa({
        toSign: hashTransaction(chainATransaction),
        publicKey: pkpPublicKey,
        sigName: "chainASignature",
      });
      await LitActions.signEcdsa({
        toSign: hashTransaction(chainBTransaction),
        publicKey: pkpPublicKey,
        sigName: "chainBSignature",
      });
      Lit.Actions.setResponse({
        response: JSON.stringify({ chainATransaction, chainBTransaction }),
      });
    };
As everything on the blockchain works on hexadecimal hashes, we need to hash our transactions as well.
    const hashTransaction = (tx) => {
      return ethers.utils.arrayify(
        ethers.utils.keccak256(
          ethers.utils.arrayify(ethers.utils.serializeTransaction(tx)),
        ),
      );
    }

    Lit.Actions.setResponse({ response: "Conditions for swap not met!" });
  }
go();
We need to remember to set Lit.Actions.setResponse before we finish executing the Lit Action. This defines the response that will be shown when the Lit Action finishes executing.
The complete swap Lit Action can be found here.
3) Implementing Mint/Grant/Burn with SDK
Installing and importing the relevant packages
npm i \
@lit-protocol/lit-node-client \
@lit-protocol/contracts-sdk \
@simplewebauthn/browser \
@lit-protocol/types ethers \
import { LitNodeClient } from "@lit-protocol/lit-node-client";
import { LitContracts } from "@lit-protocol/contracts-sdk";
import { LitNetwork, AuthMethodScope, LIT_RPC, LIT_CHAINS } from "@lit-protocol/constants";
import { LitAbility } from "@lit-protocol/types";
import {
    LitActionResource,
    createSiweMessageWithRecaps,
    generateAuthSig,
    LitPKPResource,
} from "@lit-protocol/auth-helpers";
import { ethers } from "ethers";
import bs58 from "bs58";
Creating our two wallet instances
These wallets will represent the two parties involved in the swap.
async function getWalletA() {
    const provider = new ethers.providers.JsonRpcProvider(
        `https://yellowstone-rpc.litprotocol.com/`
    );
    const wallet = new ethers.Wallet(
        process.env.NEXT_PUBLIC_PRIVATE_KEY_1,
        provider
    );
    return wallet;
}

async function getWalletB() {
    const provider = new ethers.providers.JsonRpcProvider(
        LIT_RPC.CHRONICLE_YELLOWSTONE
    );
    const wallet = new ethers.Wallet(
        process.env.NEXT_PUBLIC_PRIVATE_KEY_2,
        provider
    );
    return wallet;
}
Creating our Lit Action and uploading it to IPFS
Once we are done with our Lit Action, we need to upload it to IPFS so we get an immutable CID which will always point to our action.
export async function createLitAction() {
    console.log("creating lit action..");
    const action = createERC20SwapLitAction(chainAParams, chainBParams);
    const ipfsCid = await uploadViaPinata(action);

    console.log("Lit Action code:\n", action);
    console.log("IPFS CID: ", ipfsCid);
    return ipfsCid;
}
Create a Mint/Grant/Burn PKP
Currently, direct calls to the smart contract’s m/g/b function are currently failing with the Lit Network. We’ll replicate the same functionality using the SDK.
We'll be using mintNextAndAddAuthMethods to perform 3 calls in a single transaction:
- Mint a PKP with the user's wallet
- Add the Lit Action as a permitted auth method
- 'Burn' the PKP NFT by transferring it to itself so that no additional auth methods can be added. Effectively, this offers the same functionality as the M/G/B method
Now our PKP can only be used to execute the Lit Action we permitted when we added it as an auth method. It will only generate signatures when the Lit Action is running and the conditions we set have been met.
export async function mintGrantBurnPKP(action_ipfs, mintedPKP) {
    console.log("minting started..");
    const signerA = await getWalletA();

    const litContracts = new LitContracts({
        signer: signerA,
        network: LitNetwork.DatilDev,
        debug: false,
    });

    const bytesAction = await stringToBytes(action_ipfs);
    const pkpMintCost = await litContracts.pkpNftContract.read.mintCost();

    await litContracts.connect();

    const tx =
        await litContracts.pkpHelperContract.write.mintNextAndAddAuthMethods(
            AuthMethodType.LitAction, // keyType
            [AuthMethodType.LitAction], // permittedAuthMethodTypes
            [bytesAction], // permittedAuthMethodIds
            ["0x"], // permittedAuthMethodPubkeys
            [[AuthMethodScope.SignAnything]], // permittedAuthMethodScopes
            false, // addPkpEthAddressAsPermittedAddress
            true, // sendPkpToItself
            {
                value: pkpMintCost,
                maxFeePerGas: ethers.BigNumber.from("1800000000"),
            }
        );

    const receipt = await tx.wait();
    console.log(
        "pkp minted, added lit action as auth, and transferred to itself: ",
        receipt
    );

    const pkpInfo = await getPkpInfoFromMintReceipt(receipt, litContracts);
    console.log("pkp: ", pkpInfo);

    return pkpInfo;
}
Depositing tokens for the swap
To deposit swap tokens along with some native tokens for gas
export async function depositOnChainA(action_ipfs, mintedPKP) {
    console.log(
        `deposit started from wallet A on chain A (${chainAParams.chain})..`
    );
    let wallet = await getWalletA();

    // chain provider
    const chainAProvider = new ethers.providers.JsonRpcProvider(
        LIT_CHAINS[chainAParams.chain].rpcUrls[0]
    );
    wallet = wallet.connect(chainAProvider);

    // sometimes you may need to add gasLimit
    const transactionObjectToken = {
        to: chainAParams.tokenAddress,
        from: await wallet.getAddress(),
        data: generateCallData(
            mintedPKP.ethAddress,
            ethers.utils
                .parseUnits(chainAParams.amount, chainAParams.decimals)
                .toString()
        ),
    };

    const tx = await wallet.sendTransaction(transactionObjectToken);
    const receipt = await tx.wait();

    console.log("token deposit executed: ", receipt);

    console.log("depositing some funds for gas..");

    // gas value differs for chains, check explorer for more info
    const transactionObjectGas = {
        to: mintedPKP.ethAddress,
        value: ethers.BigNumber.from("1000000000000000"),
        gasPrice: await chainAProvider.getGasPrice(),
    };

    const tx2 = await wallet.sendTransaction(transactionObjectGas);
    const receipt2 = await tx2.wait();

    console.log("gas deposit executed: ", receipt2);
}
The deposit method needs to be called each for token A from wallet A (Alice) as well as token B from wallet B (Bob).
Executing Swap Action
Now, we will execute the swap action we wrote earlier using the PKP we just generated. To do this, we'll use the executeJs method on the SDK. We'll pass the Lit Action, Session Signature, and the parameters for the Lit Action.
export async function executeSwapAction(action_ipfs, mintedPKP) {
    console.log("executing action started..");
    const sessionSigs = await sessionSigUser();
    const authSig = await getAuthSig();
Session Signatures are used to authenticate with the Lit nodes and create a secure connection to the Lit network. This essentially informs the network about the user attempting to use the Lit Network. In a Session Signature, we also include the resources we are requesting from the Lit Network. For us, that would be:
- executing the Lit action
- signing with the PKP
export async function sessionSigUser() {
    console.log("creating session sigs..");
    const ethersSigner = await getWalletA();

    await litNodeClient.connect();

    const sessionSigs = await litNodeClient.getSessionSigs({
        pkpPublicKey: mintedPKP.publicKey,
        chain: "ethereum",
        resourceAbilityRequests: [
            {
                resource: new LitPKPResource("*"),
                ability: LitAbility.PKPSigning,
            },
            {
                resource: new LitActionResource("*"),
                ability: LitAbility.LitActionExecution,
            },
        ],
        authNeededCallback: async (params) => {
            if (!params.uri) {
                throw new Error("Params uri is required");
            }

            if (!params.resourceAbilityRequests) {
                throw new Error("Params uri is required");
            }

            const toSign = await createSiweMessageWithRecaps({
                uri: params.uri,
                expiration: new Date(
                    Date.now() + 1000 * 60 * 60 * 24
                ).toISOString(), // 24 hours,
                resources: params.resourceAbilityRequests,
                walletAddress: await ethersSigner.getAddress(),
                nonce: await litNodeClient.getLatestBlockhash(),
                litNodeClient,
                domain: "localhost:3000",
            });

            return await generateAuthSig({
                signer: ethersSigner,
                toSign,
            });
        },
    });

    console.log("sessionSigs: ", sessionSigs);
    return sessionSigs;
}
The parameters for the Lit Action we mentioned above include the auth signature and gas configurations. The auth signature is used to verify conditions on the Lit Action we discussed earlier. An AuthSig is a signature created through the user's wallet and is used for authentication.
We can generate an AuthSig as shown below:
export async function getAuthSig() {
    const signer = await getWalletA();

    await litNodeClient.connect();

    const toSign = await createSiweMessageWithRecaps({
        uri: "http://localhost:3000",
        expiration: new Date(Date.now() + 1000 * 60 * 60 * 24).toISOString(), // 24 hours
        walletAddress: await signer.getAddress(),
        nonce: await litNodeClient.getLatestBlockhash(),
        litNodeClient,
    });

    const authSig = await generateAuthSig({
        signer: signer,
        toSign,
    });
    return authSig;
}
// this remains valid for 24hrs
Gas configuration may vary from chain to chain but for the current chains, the configurations below work well. You may need to sometime specify more parameters while constructing a transaction object.
    const chainAProvider = new ethers.providers.JsonRpcProvider(
        LIT_CHAINS[chainAParams.chain].rpcUrls[0]
    );

    const chainBProvider = new ethers.providers.JsonRpcProvider(
        LIT_CHAINS[chainBParams.chain].rpcUrls[0]
    );

    // sometimes you may need to configure gas values manually, try checking test minting methods for more info
    const gasConfigA = {
        gasLimit: ethers.BigNumber.from("54000"),
        maxPriorityFeePerGas: ethers.BigNumber.from("1500000000"),
        maxFeePerGas: ethers.BigNumber.from("1500000000"),
        chainId: LIT_CHAINS[chainAParams.chain].chainId,
        nonce: await chainAProvider.getTransactionCount(mintedPKP.ethAddress),
    };

    const gasConfigB = {
        maxFeePerGas: ethers.BigNumber.from("1500000000"),
        chainId: LIT_CHAINS[chainBParams.chain].chainId,
        nonce: await chainBProvider.getTransactionCount(mintedPKP.ethAddress),
    };

    await litNodeClient.connect();

    const results = await litNodeClient.executeJs({
        ipfsId: action_ipfs,
        sessionSigs: sessionSigs,
        jsParams: {
            pkpPublicKey: mintedPKP.publicKey,
            pkpAddress: mintedPKP.ethAddress,
            authSig: JSON.stringify(authSig),
            chainAGasConfig: gasConfigA,
            chainBGasConfig: gasConfigB,
        },
    });

    console.log("results: ", results);
Based on the results returned by the nodes, we can execute the signed transactions by sending them to the blockchain networks.
    if (results.signatures == undefined) {
        return;
    }

    else if (results.signatures.chainBSignature == undefined) {
        console.log("executing clawbackA tx..")
        await executeTxA(results, chainAProvider);
    }

    else if (results.signatures.chainASignature == undefined) {
        console.log("executing clawbackB tx..")
        await executeTxB(results, chainBProvider);
    }

    else {
        console.log("executing swap txs..")
        await executeTxA(results, chainAProvider);
        await executeTxB(results, chainBProvider);
    }
}
These two functions will handle sending individual transactions on each network.
async function executeTxA(results, chainAProvider) {
    const signatureA = formatSignature(results.signatures.chainASignature);
    const tx1 = await chainAProvider.sendTransaction(
        ethers.utils.serializeTransaction(
            results.response.chainATransaction,
            signatureA
        )
    );
    console.log(tx1);

    const receipt1 = await tx1.wait();
    const blockExplorer1 = LIT_CHAINS[chainAParams.chain].blockExplorerUrls[0];

    console.log(`tx: ${blockExplorer1}/tx/${receipt1.transactionHash}`);
}

async function executeTxB(results, chainBProvider) {
    const signatureB = formatSignature(results.signatures.chainBSignature);
    const tx2 = await chainBProvider.sendTransaction(
        ethers.utils.serializeTransaction(
            results.response.chainBTransaction,
            signatureB
        )
    );
    const receipt2 = await tx2.wait();
    const blockExplorer2 = LIT_CHAINS[chainBParams.chain].blockExplorerUrls[0];

    console.log(`tx: ${blockExplorer2}/tx/${receipt2.transactionHash}`);
}
A signed transaction returned by the Lit Network has a different structure for signatures that we need to reconstruct as follows:
function formatSignature(signature) {
    const encodedSig = ethers.utils.joinSignature({
        v: signature.recid,
        r: `0x${signature.r}`,
        s: `0x${signature.s}`,
    });
    return encodedSig;
}
You can also explore other methods, such as checking permissions on the PKP, checking the fund status of each wallet, or the PKP itself here.
Summary
In the following example you should have learned how to:
- Created transaction and clawback transaction objects based on specific swap parameters.
- Wrote a Lit Action that returns signed blockchain transactions based on the specific conditions you defined.
- Minted a PKP and assigned it the Lit Action.
- Burned the PKP to restrict its signing ability to the Lit Action only.
- Deposited funds to the PKP on two blockchains where our swap will be conducted between.
- Executed the Lit Action on the Lit network to return our signed transaction objects.
- Broadcast and executed the transactions on their respective chains.